
The Step-by-Step Process of a Professional Roof Replacement
Replacing a roof is one of the most significant investments a homeowner can make to protect their property. A well-executed replacement not only safeguards against weather damage but also enhances energy efficiency, curb appeal, and resale value. To achieve these benefits, the process must be handled with skill, precision, and careful planning. Understanding the sequence of a professional roof replacement ensures you know what to expect and how each stage contributes to the final result.
A professional roof replacement involves far more than simply removing old shingles and installing new materials. It requires thorough inspection, precise installation techniques, and strict adherence to safety and building code requirements. Each step builds upon the last, ensuring the roof performs reliably for decades. The following guide breaks down the process into clear stages, providing homeowners with insight into the craftsmanship and detail that go into a successful project.
Step 1: Comprehensive Roof Inspection and Project Planning
The first stage of a professional roof replacement is a detailed inspection to assess the condition of the existing roof. This evaluation covers shingles, flashing, underlayment, decking, ventilation, and drainage systems. Inspectors look for signs of leaks, structural weaknesses, and code compliance issues. A thorough assessment determines whether any repairs to the roof deck or framing are necessary before installation begins.
Once the inspection is complete, the contractor discusses material options, color choices, and warranty details with the homeowner. Planning also includes scheduling the project during a window of favorable weather to avoid delays and complications. Material orders are placed, and any necessary permits are secured from local authorities.

Accurate measurements are taken to ensure that all roofing materials are cut and fitted precisely, reducing waste and preventing installation errors. This planning stage is critical for aligning homeowner expectations with the contractor’s timeline and work scope. Proper preparation at this stage ensures a smooth workflow once the project begins.
By investing time in thorough inspection and planning, the likelihood of unforeseen issues during the installation phase is significantly reduced. This careful start sets the tone for a professional roof replacement that meets both functional and aesthetic goals.
Step 2: Site Preparation and Safety Measures
Before the actual removal of the old roof, the site must be prepared to ensure safety and minimize disruption. Protective coverings are placed over landscaping, driveways, and any outdoor furniture to shield them from debris. Contractors set up scaffolding, ladders, and safety harnesses in compliance with industry safety standards.
Materials are staged in a way that allows for efficient workflow. Shingles, underlayment, nails, and flashing are organized and kept close to the work area without obstructing access. Waste containers are positioned nearby to collect old roofing materials as they are removed.
The crew also communicates with the homeowner about access restrictions during the project. Clear paths for material transport and debris removal help keep the job site organized. Noise levels, dust control, and work hours are discussed to minimize inconvenience.
A well-prepared site ensures the crew can work quickly and safely while protecting the property. This step is a hallmark of a professional roof replacement, as it reflects attention to detail and respect for the homeowner’s space.
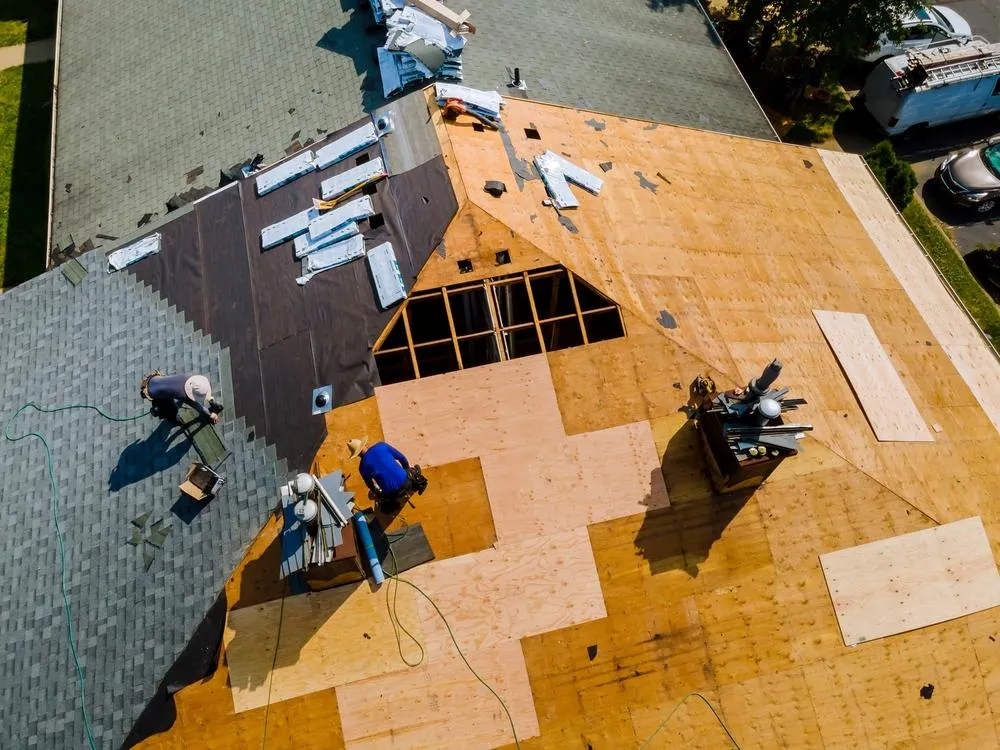
Step 3: Removal of Old Roofing Materials
The removal phase involves stripping the existing roofing material down to the decking. All old shingles, nails, flashing, and underlayment are carefully removed and disposed of according to local regulations. This thorough removal allows the contractor to assess the bare decking for any signs of rot, warping, or structural compromise.
Damaged decking sections are replaced to ensure a solid foundation for the new roofing system. This step is crucial because installing new materials over compromised decking will shorten the lifespan of the roof and risk future leaks.
Once the surface is prepared, any necessary adjustments to ventilation openings or drainage pathways are made. Proper ventilation prevents heat buildup and moisture retention, which can degrade roofing materials over time.
The removal process may be noisy and disruptive, but it is a critical step to ensure the new roof performs at its best. A professional roof replacement does not cut corners by installing over old materials unless specific conditions allow it.
Step 4: Installation of New Roofing System
With the deck prepared, the installation phase begins with the placement of underlayment. This waterproof layer acts as a barrier against moisture infiltration and is installed with precision to prevent gaps or wrinkles. Ice and water shields may be added in vulnerable areas such as valleys, eaves, and around roof penetrations.
Flashing is then installed or replaced around chimneys, skylights, vents, and other protrusions to direct water away from seams. Properly installed flashing is essential to preventing leaks in these high-risk areas.

The chosen roofing material—whether asphalt shingles, steel panels, or another option—is installed according to manufacturer guidelines and local building codes. Each row is aligned and secured to withstand wind uplift, rain, and snow loads. Attention to detail during this phase ensures both performance and visual appeal.
Finally, ridge caps and ventilation systems are added to promote airflow in the attic. This helps regulate temperature and humidity, extending the life of the roofing materials. A professional roof replacement focuses on both functionality and aesthetics at every stage of installation.
Step 5: Final Inspection and Site Cleanup
Once installation is complete, a final inspection is conducted to ensure the roof meets quality standards and project specifications. The contractor checks all seams, flashing, and edges for proper sealing. Ventilation systems are evaluated for correct airflow, and drainage is tested to ensure water flows away from the home effectively.
Cleanup is a critical part of this final stage. All debris, nails, and unused materials are removed from the site. Magnets are often used to collect stray nails from lawns and driveways. Protective coverings are taken down, and the property is returned to its original condition.
The homeowner is then walked through the finished project. Warranties for both materials and workmanship are reviewed, and maintenance recommendations are provided. This ensures the homeowner understands how to care for the new roof moving forward.
A professional roof replacement concludes with complete transparency and homeowner satisfaction. This attention to post-installation details demonstrates commitment to quality service and lasting results.
Protect Your Home with Expert Roof Replacement Services
A professional roof replacement is a complex, multi-step process that requires expertise, precision, and dedication to quality. From the initial inspection to the final walkthrough, every stage is designed to ensure your new roof performs reliably for decades. The investment not only safeguards your home but also enhances its curb appeal and energy efficiency.
Muir Roofing and Construction delivers exceptional craftsmanship and reliable results on every professional roof replacement. Our team is committed to using the highest-quality materials and proven installation techniques. Contact us today to schedule your roof consultation and protect your home with confidence.
